
前回、スプレッドシートの日付機能を使ったカレンダー作成方法についてご紹介しました。
-

-
【超裏ワザ】スプレッドシートでカレンダーを速攻作成!これはスゴイw
注意! 2021年版のスプレッドシートでは、本記事の裏技は使えなくなりました。代わりに以下記事を参考にご対応ください↓ ...
続きを見る
しかし、1からスプレッドシートでカレンダーを作りたい時もありますよね。

こんな感じとか...
こんな感じに...
そこで今回はスプレッドシートでカレンダーを作成!縦・横ドラッグで簡単に完成させようについてご紹介させていただきます!
スプレッドシートでカレンダーを作成!縦型・横型を作ってみよう!
冒頭でご紹介したGifアニメの様に、「スプレッドシートでカレンダーを作成する」には、コツがあります。
- DATE関数で日付を取得する
- WEEKDAY関数で土日に色付けする
主にこの2つの関数を使うことで、一気にカレンダーを作成することが出来るんです。
DATE 関数は、特定の日付を表す連続したシリアル値を返します。
書式:DATE(年,月,日)
引用元:https://support.office.com/ja-jp/article/DATE-関数
WEEKDAY関数は、日付に対応する曜日を返します。 既定では、戻り値は 1 (日曜) から 7 (土曜) までの範囲の整数となります。
書式:WEEKDAY(シリアル値,[週の基準])
引用元:https://support.office.com/ja-jp/article/WEEKDAY-関数
なんやら難しい感じのこと書いてますが、難しくありません。

では一緒に作っていきましょう。
スプレッドシートでカレンダー作成:縦型
先ずは縦型カレンダーの作成方法です。
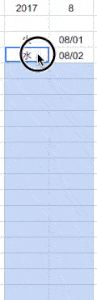
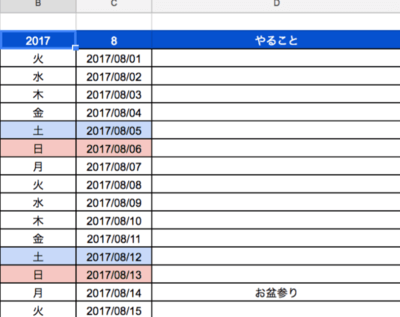
イメージとしてはこんな感じにB:C列にカレンダー表示していきます↓
関連記事: スプレッドシート開いたら今日の日付(列や行)へ移動させる方法
ちょっとだけ手間ですが縦型のカレンダーを作成することで、横型も一瞬で作成可能です。
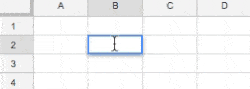
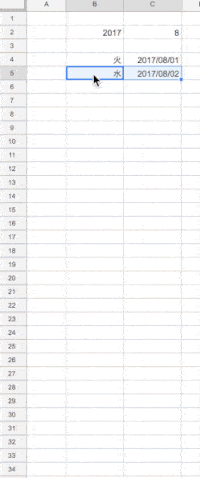
STEP1. B2セルに西暦、C2セルに月を入力
B2セルに「西暦(4桁)」を入力し、C2セルにカレンダーにしたい「月」を入力します。
ここで設定した値は、次の「DATE関数(日付)」で必要になる値です。
入力した値
- B2セル:「2017」(年)
- C2セル:「8」(月)
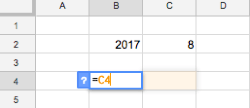
STEP2. B4セルに「=C4」、C4セルにDATE関数を入力
B4セルに「=C4」を入力します。
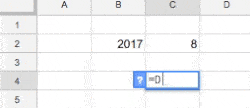
次にC4セルに「=date(B2,C2,1)」を入力して「月の1日」を取得します。
入力した値
- B4セル:「=C4」
- C4セル:「=DATE(B2,C2,1)」(日付)
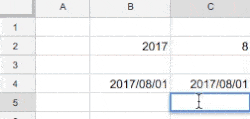
STEP3. B5セルに「=C5」、C5セルに「=C4+1」を入力
B5セルに「=C5」を入力します。
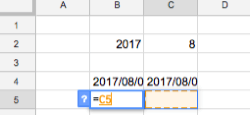
C5セルに「=C4+1」を入力して連続データの準備をします。
入力した値
- B5セル:「=C5」
- C5セル:「=C4+1」(1日+1)
STEP4. 「B列」を曜日に変えてweekday関数で土日に色付け
4-1. B列の表示を曜日に変更する
スプレッドシートでは関数を使わずに日付を曜日表示に変更出来ます。
タブ「表示形式」>「数字」>「表示形式の詳細設定」を選択
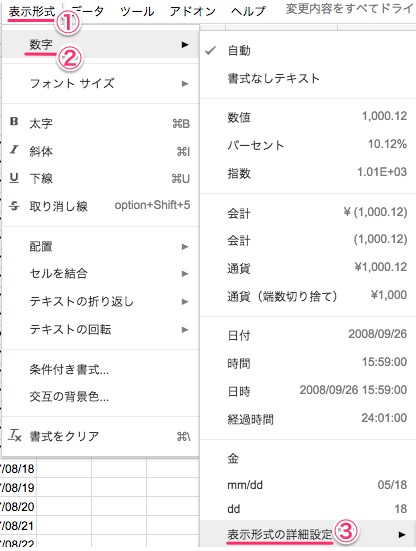
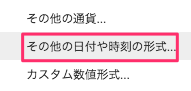
「その他の日付や時刻の形式」を選択
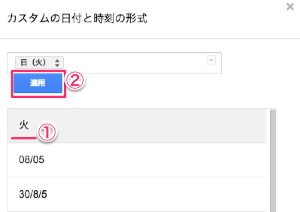
プルダウンから「火」を選択>「適用」を選択。
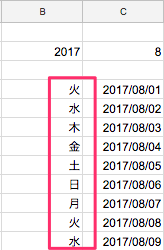
B列が「曜日」に変更されました。
4-2. weekday関数で土日に色付け
自動で土日に色付けする設定を行います。
「B:C列」を選択 >タブ「表示形式」>「条件付き書式」を選択。
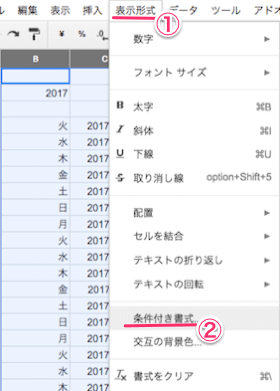
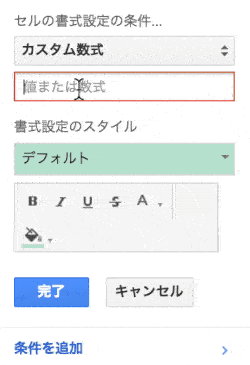
「条件付き書式設定ルール」画面 > セルの書式設定の条件「空白ではないセル」をクリック。
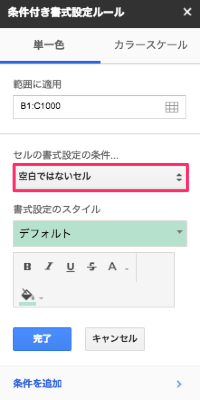
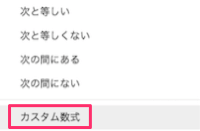
プルダウンが表示されるので、「カスタム数式」を選択。
アニメーションで↓

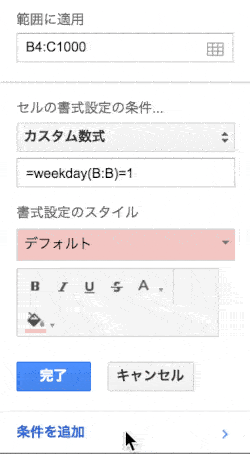
範囲に適用箇所を「B1→B4〜」に修正して...
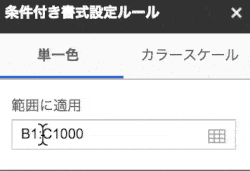
カスタム数式に「=weekday(B:B)=1」と入力して「完了」をクリック。(日曜日に赤色)
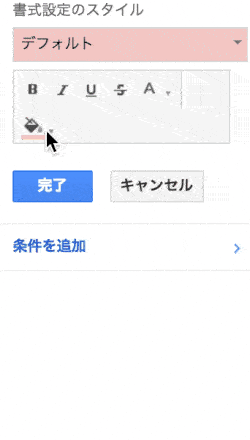
「条件を追加」を選択 > カスタム数式を「=weekday(B:B)=7」に変更。(土曜表示の際、色を変更します)
書式設定のスタイルの色を水色に変更して「完了」をクリック。
これで下準備は出来ました。あとはドラッグして数式をコピーしていきましょう♪
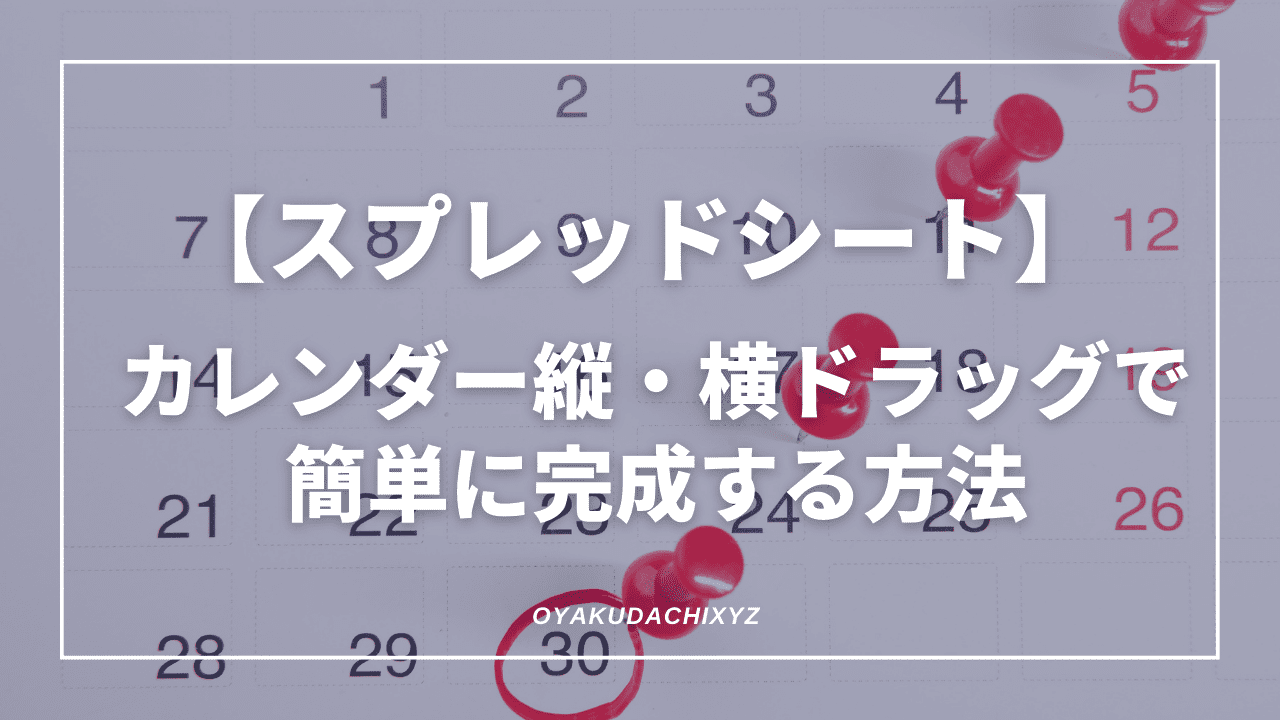
STEP5. 「B5:C5」を選択して下までドラッグ
B5とC5を選択して34行目までドラッグします。(先に範囲を選択してコピーしてもOKです)
あとはテキストを中央揃えにしたり、罫線をつけたり列を追加したりして完成です。
手順を5項に分けていますが、重複している手順などは後でまとめて行っても構いません。
やっぱ手順多いのは大変ですからね...。

次は横型のカレンダーの作成方法をご紹介いたします。とはいってもほぼ一瞬で終わります。